
Dryer vents keep your home safe and your dryer efficient. A damaged or clogged dryer vent hose can reduce performance, increase drying time, and even pose fire hazards. Dryer vent hose repair in DMV may seem daunting, but with the right steps and tools, you can restore it effectively. In this blog, we will explain the process step by step.
Tools and Materials You Will Need for Dryer Vent Repair
Before you start repairing the vent hose, gather the necessary tools. Having everything ready saves time and ensures a smoother repair. Here’s what you need:
- Screwdriver (flathead or Phillips, depending on hose clamps)
- Dryer vent hose replacement
- Aluminum foil tape or duct tape (high-quality, heat-resistant)
- Hose clamps or zip ties
- Scissors or utility knife
- Vacuum cleaner or lint brush
Using the correct materials prevents recurring issues and ensures your repair lasts longer.
Also Read:
Steps To Repair Dryer Vent Hose
Step 1: Unplug Your Dryer and Disconnect the Hose
Safety comes first. Before doing any repair, unplug your dryer from the power source. If you have a gas dryer, turn off the gas supply as well.
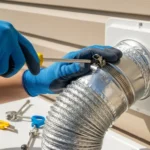
Next, carefully disconnect the vent hose from the back of the dryer. Loosen the hose clamp or unscrew any fastening hardware. Gently pull the hose away from the dryer and the wall vent.
Inspect both ends of the hose for lint build-up or damage. Removing lint at this stage improves airflow and ensures your repair is effective.
Step 2: Inspect the Dryer Vent Hose
After disconnecting the hose, examine it closely. Look for cracks, holes, or crushed sections that block airflow. Minor tears may only need patching, while severe damage might require replacing the entire hose.
Check for kinks or bends that restrict airflow. Even a partially crushed hose reduces efficiency. If the hose is over 25 feet long, consider shortening it to the recommended length to improve dryer performance.
Step 3: Clean the Hose and Vent
Before repairing, clean the inside of the hose. Use a vacuum cleaner with a hose attachment or a long lint brush. Remove all lint and debris that may have accumulated.
Next, clean the wall vent opening and the back of the dryer. Clearing lint at both ends ensures better airflow and reduces fire hazards.
A clean hose also makes tape or patch adhesion more effective.
Step 4: Repair Small Holes or Tears
For minor damage, you can patch the hose without replacing it. Use aluminum foil tape or high-quality duct tape.
- Cut a piece of tape slightly larger than the hole.
- Wrap it around the damaged section, ensuring full coverage.
- Press firmly to secure the tape.
- Check the surrounding area for additional weak spots and patch them if needed.
Avoid using standard tape that cannot withstand high dryer temperatures. Aluminum tape resists heat and holds firmly over time.
Step 5: Replace the Hose if Necessary
If the hose has extensive damage, replace it with a new one. Choose a dryer vent hose made of durable materials such as aluminum or semi-rigid metal. Avoid plastic hoses that may melt or crush easily.
- Measure the length of the old hose.
- Purchase a replacement that fits your dryer and vent.
- Attach one end to the dryer and secure it with a hose clamp.
- Connect the other end to the wall vent and tighten the clamp.
Ensure the hose runs in a straight line without sharp bends. Fewer bends improve airflow and reduce the risk of lint build-up.
Step 6: Secure the Connections
After patching or replacing the hose, ensure all connections are secure. Use hose clamps to tighten the ends on both the dryer and the wall vent.
If clamps are not available, use strong zip ties as an alternative. Make sure the connections are snug but not over-tightened, as excessive pressure may damage the hose.
Check the hose along its length to make sure it sits properly and does not sag or kink.
Step 7: Test the Dryer
Plug in the dryer and run a short test cycle. Observe the airflow at the wall vent outside your home. You should feel strong air movement and notice reduced lint discharge near the connection points.
Listen for unusual noises or vibrations. Any rattling may indicate a loose hose connection or misaligned vent. If you detect issues, turn off the dryer and adjust the hose as needed.
Regular Dryer Vent Maintenance Tips
Maintaining your dryer vent hose prevents future problems. Follow these tips:
- Clean the vent hose and dryer lint filter regularly.
- Inspect the hose for cracks, holes, or kinks every few months.
- Avoid using long, flexible plastic hoses that crush easily.
- Keep the hose as straight as possible with gentle curves.
- Ensure the wall vent cap opens freely and is not blocked by debris.
Regular maintenance improves dryer efficiency, reduces energy costs, and keeps your home safe.
Common Mistakes to Avoid During Dryer Vent Repair in DMV
- Repairing a dryer vent hose may seem simple, but avoid these common mistakes:
- Using the wrong tape: Ordinary tape melts and fails. Use heat-resistant aluminum tape.
- Ignoring small holes: Even minor tears can grow and reduce airflow.
- Kinking the hose: Sharp bends restrict airflow and cause lint accumulation.
- Over-tightening clamps: Excess pressure can damage the hose ends.
- Delaying replacement: Severely damaged hoses must be replaced for safety and efficiency.
Following proper repair techniques avoids recurring issues and keeps your dryer running smoothly.
Read More: Contractor vs In-House Duct Cleaning: Pros & Cons for Businesses
Why You Should Repair Dryer Vent Hose Immediately
Ignoring a damaged dryer vent hose can lead to serious consequences:
- Fire hazards: Lint is highly flammable and can ignite in a damaged hose.
- Reduced efficiency: The dryer works harder, increasing energy bills.
- Clothing damage: Prolonged drying times can shrink or wear out fabrics.
- Moisture buildup: Leaks in the vent can cause mold growth in your laundry area.
Repairing the hose immediately ensures safety and saves money in the long run.
Need Help for Dryer Vent Repair in DMV? Contact Delta Clean Air DMV
If you need professional help with dryer vent repair in the DMV area, Delta Clean Air DMV has you covered. Our expert team inspects, cleans, and repairs dryer vent hoses to ensure optimal airflow and safety. We handle everything from minor patching to full hose replacement, preventing fire hazards and improving dryer efficiency. With fast, reliable service, Delta Clean Air DMV keeps your laundry routine hassle-free.
Call us now and get a free quote.